
Here’s a kitchen table at bar height made for our recently remodeled kitchen.

The top is a single board of Padauk (alternate spelling – Padouk), with a black lacquered maple base.
In choosing projects, and how to accomplish them, I will often choose ones where I can attempt new techniques; (i.e. firmly not in the camp of practice makes perfect). This project had a number of firsts
- First time using loose tenon joinery (yes I want a Domino, but am too cheap to take the plunge)
- First use of a scraping plane
- First time using spray finishing on one of my projects
- First single board table top (not that this requires new technique, it’s actually easier), and the first time I have every spent more than $100 on a single board.
- First glue-up of pieces below the top to make top look thicker
- First glue failure – see description of base for detail.
This is not my first piece of furniture, nor my first table; it is my first bar height table, and my first table without skirts. More on that in the description of base.
There’s three chapters of my long winded project description; I will make these into three posts to break up the monotony.
1. Table top (this post)
2. Base - fabrication and issues
https://www.ncwoodworker.net/forums/showthread.php?t=63776
3. Finishing - table top and base
https://www.ncwoodworker.net/forums/showthread.php?t=63779&p=589646#post589646
Chapter 1 – Table top
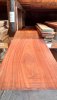
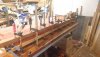
The Padauk board that became the table top was a find at Capitol City Lumber (in mid-2017; there is Padauk there now, but none this size are left). They had several boards that were both long and wide – many wider than 24” and some of these as long as 14’. I chose a 27” board approx. 7.5’ long, aiming for about a 24” wide finished table top. Here’s the rough board in their hardwood building.

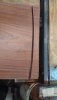
This Padauk board had some black streaks that proved a challenge to remove. 60 or 80 grit ROS sanding removed the bulk of the black stains, but ‘witness’ stains remained. After sanding I tried:
- solvents (to no avail),
- a regular handplane (limited tearout ensued; caveat here - I have little to no expertise with handplanes), and
- a card scraper (seemed to be effective, but very slow).

Then I asked for advice here on NCWW in this thread:
https://www.ncwoodworker.net/forums/showthread.php?p=577937#poststop
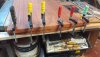
I received some good advice there, particularly Jeff’s suggestion of using a No 80 scraper plane. I promptly purchased one from Klingspor’s consignment section, benefiting greatly from an employee’s assistance and advice on usage. I was able to use that effectively to remove the bulk of the witness stains with that plane. The rest of the table top was sanded and planed (scraper) as well.

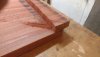
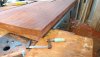
The next phase was to double up the edges of the table to make it look thicker. I had not done this before, nor really read much about exactly how other do this. Grain ‘matching’ to make the top look as seamless as possible was the goal, a challenge in the corners especially.
I first ripped a narrow piece from each side (TS) – these were full length but only about 1.25” wide. The end cuts were jigsaw cuts that only had to be rough – as I planned to rout the final curve.

These end pieces were cut and then glued underneath. I had to ensure that I had enough material glued there to accommodate the curves.

I ‘roughed out’ the curve on the glued on piece as well, and then routed the end curves using with a template and top bearing bit (2” cutting length I believe).
Then to achieve grain matching (as well as possible) at the corners, I miter cut the bottom pieces (re-reading I see I cut the miters before I routed the final curve). Because I had used curves on the ends, I decided to 'piece fit' and glue the 4 individual pieces onto the bottom rather than make a full 4 piece mitered frame and glue that to the bottom. I wasn’t sure the glued on full frame would achieve grain matches at the corners, especially with the curved ends. I did the bottom miter cuts on the end pieces with a back saw after glue up, simply cutting to the line.

The only critical part was to keep the saw cut perpendicular, and I used a clamped on block at side of blade and in line with the cut to ensure perpendicularity. 3 of the 4 cuts were acceptable done, while I had allowed the saw to wander from the line somewhat on one corner.
I then took the full length side pieces, which were now longer than the table because I had cut the ends, and miter cut (power saw) those to fit the openings between the end miters. Hope that makes sense. Glued and clamped these.

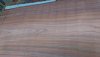
The grain is not a perfect match, but the given the grain (rift sawn?) this was certainly acceptable to me.

I filled some defects in the surface and end cuts with sawdust and glue, then did final prep on surface for finishing (more details on finishing in that chapter).
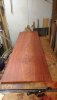
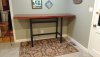
This finished top portion then went in place in our kitchen – on a slapped together prototype base (i.e. 1x3 pine, held together with pocket screws). It served as a functional table, albeit on a wobbly base.
The next posts will detail base construction and my mistakes there, and finally the finishing process.
The top is a single board of Padauk (alternate spelling – Padouk), with a black lacquered maple base.
In choosing projects, and how to accomplish them, I will often choose ones where I can attempt new techniques; (i.e. firmly not in the camp of practice makes perfect). This project had a number of firsts
- First time using loose tenon joinery (yes I want a Domino, but am too cheap to take the plunge)
- First use of a scraping plane
- First time using spray finishing on one of my projects
- First single board table top (not that this requires new technique, it’s actually easier), and the first time I have every spent more than $100 on a single board.
- First glue-up of pieces below the top to make top look thicker
- First glue failure – see description of base for detail.
This is not my first piece of furniture, nor my first table; it is my first bar height table, and my first table without skirts. More on that in the description of base.
There’s three chapters of my long winded project description; I will make these into three posts to break up the monotony.
1. Table top (this post)
2. Base - fabrication and issues
https://www.ncwoodworker.net/forums/showthread.php?t=63776
3. Finishing - table top and base
https://www.ncwoodworker.net/forums/showthread.php?t=63779&p=589646#post589646
Chapter 1 – Table top
The Padauk board that became the table top was a find at Capitol City Lumber (in mid-2017; there is Padauk there now, but none this size are left). They had several boards that were both long and wide – many wider than 24” and some of these as long as 14’. I chose a 27” board approx. 7.5’ long, aiming for about a 24” wide finished table top. Here’s the rough board in their hardwood building.
This Padauk board had some black streaks that proved a challenge to remove. 60 or 80 grit ROS sanding removed the bulk of the black stains, but ‘witness’ stains remained. After sanding I tried:
- solvents (to no avail),
- a regular handplane (limited tearout ensued; caveat here - I have little to no expertise with handplanes), and
- a card scraper (seemed to be effective, but very slow).
Then I asked for advice here on NCWW in this thread:
https://www.ncwoodworker.net/forums/showthread.php?p=577937#poststop
I received some good advice there, particularly Jeff’s suggestion of using a No 80 scraper plane. I promptly purchased one from Klingspor’s consignment section, benefiting greatly from an employee’s assistance and advice on usage. I was able to use that effectively to remove the bulk of the witness stains with that plane. The rest of the table top was sanded and planed (scraper) as well.
The next phase was to double up the edges of the table to make it look thicker. I had not done this before, nor really read much about exactly how other do this. Grain ‘matching’ to make the top look as seamless as possible was the goal, a challenge in the corners especially.
I first ripped a narrow piece from each side (TS) – these were full length but only about 1.25” wide. The end cuts were jigsaw cuts that only had to be rough – as I planned to rout the final curve.
These end pieces were cut and then glued underneath. I had to ensure that I had enough material glued there to accommodate the curves.
I ‘roughed out’ the curve on the glued on piece as well, and then routed the end curves using with a template and top bearing bit (2” cutting length I believe).
Then to achieve grain matching (as well as possible) at the corners, I miter cut the bottom pieces (re-reading I see I cut the miters before I routed the final curve). Because I had used curves on the ends, I decided to 'piece fit' and glue the 4 individual pieces onto the bottom rather than make a full 4 piece mitered frame and glue that to the bottom. I wasn’t sure the glued on full frame would achieve grain matches at the corners, especially with the curved ends. I did the bottom miter cuts on the end pieces with a back saw after glue up, simply cutting to the line.
The only critical part was to keep the saw cut perpendicular, and I used a clamped on block at side of blade and in line with the cut to ensure perpendicularity. 3 of the 4 cuts were acceptable done, while I had allowed the saw to wander from the line somewhat on one corner.
I then took the full length side pieces, which were now longer than the table because I had cut the ends, and miter cut (power saw) those to fit the openings between the end miters. Hope that makes sense. Glued and clamped these.
The grain is not a perfect match, but the given the grain (rift sawn?) this was certainly acceptable to me.
I filled some defects in the surface and end cuts with sawdust and glue, then did final prep on surface for finishing (more details on finishing in that chapter).
This finished top portion then went in place in our kitchen – on a slapped together prototype base (i.e. 1x3 pine, held together with pocket screws). It served as a functional table, albeit on a wobbly base.
The next posts will detail base construction and my mistakes there, and finally the finishing process.
Attachments
-
 IMG_20160813_101546333_HDR.jpg211.6 KB · Views: 291
 -
 IMG_20170826_152754708.jpg246.4 KB · Views: 294
 -
 IMG_20170716_173533842.jpg206.4 KB · Views: 297
 -
 IMG_20170813_142848092.jpg255.3 KB · Views: 305
 -
 IMG_20170826_155110109.jpg311.4 KB · Views: 304
 -
 IMG_20170827_175728063.jpg174.8 KB · Views: 307
 -
 IMG_20170827_191847361.jpg287.1 KB · Views: 308
 -
 IMG_20171231_170604500.jpg244.9 KB · Views: 309
 -
 IMG_20170902_175947211.jpg275.7 KB · Views: 304
Last edited: