Odd little entry table

Ted P

Ted
Corporate Member
My daughter would like for me to build a table approximating this one:


The pictures appear to have veneer wrapped around the curved surfaces. I'm thinking this could be built by edge glueing boards to width and then laminating them to make a bulky blank. After the glue sets, band saw the curves and sand smooth. Sanding the inner curved surface I'm thinking would require a rolling pin style drum sander. I can only plane and band saw 13" so the table would be slightly narrower than the purchased one, but should work similarly. Thinking to use ash with a suitable stain and finish.

One fear is the bottom and top will not remain parallel with changes in humidity with my methodology.

Any constructive criticism to my basic plan would be appreciated.
 

cyclopentadiene

Update your profile with your name
User
Study some of the Wendell Castle videos. Ghost clock, one of my favorite of all woodworking masterpieces is made from glued up stock then shaped. It is well worth seeing the work at the Renwick gallery next time it is on display.
There are a couple of others with articles in Fine Woodworking that use these techniques but I do no remember their names. The image below is a slightly more complex table he constructed.


1658458310107.jpeg
 
Last edited:

NOTW

Notw
Senior User
My first thought was to cut all the shapes out of a substrate like MDF, get the first one right the use it as a pattern on the router to batch out as many as you need to get the desired depth then veneer the entire thing.
 

mpeele

michael
User
I built something simular using U shaped torsion box with ribs made from 2 layers of brick laid 1/4" plywood to form the curved section. That was covered with 3/8" bending plywood and then veneered. Before veneering sides and ends were covered with 1/2" hardwood.
 

Ted P

Ted
Corporate Member
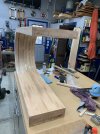
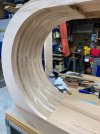
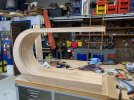
I ignored all the feedback about my proposed project. It is now far enough along that I feel success is within my grasp and can post pictures. No pics of the backside curve as lots of belt sanding needed to smooth the curve. Top is slightly hollow, bottom was filled with junk MDF for weight/stability. Curved portion is laminated at 90 deg and glued up. Total width limited to 12.5" as that's close to my planer width and bandsaw cutting depth limitations. If the lumber wasn't "free" this might not be a great construction plan.
I learned that laminating large flat surfaces is not a simple task as the glue layer makes tiny movement inevitable. Sanding the inside curve was a looming issue in my mind until I stumbled across a very inexpensive Grizzly spindle sander on Craig's List. IMG_6043.jpgIMG_6044.jpgIMG_6042.jpg
 

Dee2

Board of Directors, Vice President
Gene
Staff member
Corporate Member
looks like a great build story for the Resources forum. Please consider a full write up.
 

PhilErup

PhilErup
User
Just be careful with clamping and alignment. For sanding, consider a flexible strip or sandpaper around a form. To address humidity, use kiln-dried wood and tabletop fasteners.
 

Wilsoncb

Williemakeit
Corporate Member
Well, what you did looks pretty good, proving the “right way” is whatever works for you. Now you can do a Youtube video as a self proclaimed expert and show everyone the way it’s done.🙂
 

Premier Sponsor

Our Sponsors

LATEST FOR SALE LISTINGS

Top