Misc drill press upgrades from scrap and spare parts.

Scott H

Scott
User
I've been trying to do some very small projects that I can mostly do in a day or two each, without buying anything new -- and also forcing myself to be creative and work with my scrap pile. Not focused on aesthetics, just functionality. Working on larger complicated projects is nice but I am tired of things taking weeks and having to keep hitting stores or mail ordering parts or materials.

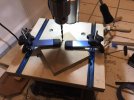
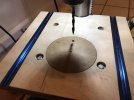
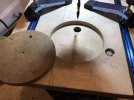
Since I upgraded the chuck on my small WEN 4210 drill press I have been very pleased with how it's performing. So I've spent a little time here and there making other small improvements.
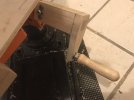
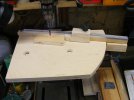
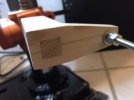
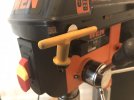
  • New height adjustment crank with a longer shaft so I can eventually make a nicer table without a clearance notch in the corner -- which will allow me to put T track in for a fence/hold downs.
    • Crank is just made out of scrap furring strip with a through mortise+tenon for the shaft/crank arm connection
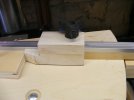
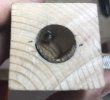
    • Spare 1/4" ID oilite bushing used to keep the knob stud from chewing up the pine over time.
    • Will use a spare cheap file handle as the revolving knob (next on the to-do list.)
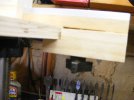
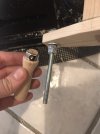
    • The DP connects to the crank arm via a 14mm D-shaft, I didn't have a 14mm bit so I used a 5/8" one and just put gasket material opposite the setscrew.
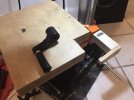
  • Located all of the sources of rattle when it is running and put 1/16" cork/rubber gasket material hot glued to silence them. MUCH quieter now. Hard one to find was the underside of the belt compartment enclosure bumping against the top of one of the screws on the motor.
  • Just hot glued a spare magnet to the DP to hold the new chuck's key, since it is too large to fit in the old chuck key holder. Magnet seems a lot more convenient and I think I am remembering to put it back more often since it's less effort.
Nothing complex, but it feels motivating to finish a small thing every day instead of one huge thing every month (or more.)
 

Attachments

  • IMG_4931.JPEG
    IMG_4931.JPEG
    419.9 KB · Views: 92
  • IMG_4941.JPEG
    IMG_4941.JPEG
    484.6 KB · Views: 86
  • IMG_4947.JPEG
    IMG_4947.JPEG
    409.6 KB · Views: 89
  • IMG_4937.JPEG
    IMG_4937.JPEG
    524.9 KB · Views: 83
  • IMG_4938.JPEG
    IMG_4938.JPEG
    446.8 KB · Views: 90
  • IMG_4945.JPEG
    IMG_4945.JPEG
    446.1 KB · Views: 91
  • IMG_4943.jpeg
    IMG_4943.jpeg
    607.3 KB · Views: 93
Last edited:

Scott H

Scott
User
Got the crank handle done. Tapped the file handle for 1/4-20, drilled a cross-hole in the ferrule, threaded it in place with a bolt on the arm and a very thin shim, and then drilled through the bolt and pulled out the shim. Works pretty well now. We will see if the set screw has trouble holding with the amount of wobble/torque on it now but I will figure out alternatives if it doesn't.
 

Attachments

  • IMG_4956.jpeg
    IMG_4956.jpeg
    525.8 KB · Views: 65

Scott H

Scott
User
Got the new drill press table made Sunday. I still need to do one or two things to it but I am really happy with how quickly it got done. Again just made from material and parts I had sitting around.

  • The table itself is 12x12 and 1" thick, two 1/2' Baltic Birch plywood layers glued together with any slight bow opposing so it ends up pretty flat.
  • Consistent ~2" lip for clamping on all sides relative to the cast iron table.
  • 1" is thinner than the 1.5" from the two layers of 3/4" MDF which will give me back some height I lost from the bigger chuck.
  • T-track for hold downs and fence.
  • There is now a hole through the table center that lines up with the hole in the cast iron table, which allows me to align the table's center using a dowel, and also to swap out very long bits that can't tilt out of the chuck, without moving the table. The removable insert should help here too a little.
    • Since the plunge depth on this DP is so limited I have run into situations where I needed to swap bits that way in the past without disturbing my setup.
  • No notch in the corner any more + the table extends past the the column -- means I can actually put in equal length T track and have the fence retract to the column when not in use or when I am working on a wide part.
  • Bolts down from the top instead of up from the bottom, seems less annoying to put on/take off. Could eventually make a bracket for underneath for quicker assembly/disassembly.
  • Rotating sacrificial 1/2" MDF insert. Lets me have support behind the workpiece while also using T-track.
    • This was kind of annoying to make + I don't have much 1/2 MDF scrap, so I only have one currently.
    • Made a very basic jig to turn it from an octagon to a circle on a 36 grit belt on my 1x30 belt sander -- definitely wear a mask for this one! Fine tuning the diameter is tricky, may need to make a better jig in the future to make a whole stack, or maybe I will just pattern route off this one.
    • Since the plywood is not exactly on dimension, and the pocket was made just by cutting a hole in the top layer before glue up, I had to plane down the MDF carefully. Again an opportunity for something a little faster in the future... I do not have a thickness planer unfortunately.
    • Getting it to where it is always, always perfectly flush with the table even when removing/inserting or rotating was beyond my ability, but I got it to where it is extremely close, like maybe 0.001-0.002" or something. I do not feel like I can expect better from wood or my hand planing skills without spending a ton of time on it or making some kind of fancy adjustment mechanism. I can always use tape shims if I overshoot the planing.
I still need to make the adjustment screw mechanism to correct for the fact the stock DP table is not quite square front-to-back, but that is basically just a matter of drilling one hole, putting in a threaded insert, and getting my hands on a 1" set screw. The sacrificial insert makes it a little more annoying to check the table for squareness since it's not perfectly, perfectly flat to the table, but I think having T-track + a fence is going to make up for that minor annoyance.

Next up is a fence, and maybe making a stack of MDF inserts so I don't have to treat them as being very precious.
 

Attachments

  • IMG_5129.JPEG
    IMG_5129.JPEG
    629.9 KB · Views: 61
  • IMG_5130.JPEG
    IMG_5130.JPEG
    611.6 KB · Views: 59
  • IMG_5131.jpeg
    IMG_5131.jpeg
    663.1 KB · Views: 58

Charles Lent

Charley
Corporate Member
For drilling small parts, I made a table and fence accessory for one of my drill presses. The fence of this add-on table pivots on a long bolt in the left rear corner of the table and the table (made from 3/4 cabinet birch ply) was cut on an arc to allow the sliding right end of the fence to have a clamp made from wood to grip this edge of the table. A long carriage bolt down through the fence with a threaded knob on the bottom of it lets me tighten and pinch lock the fence in any desired position. The top of the fence has a piece of aluminum T-Slot attached and I made a right angle stop to slide on this with a bolt and threaded knob to lock it in any position. Counterbored holes through this table let me use carriage bolts recessed below the table surface and threaded knobs below to secure this wooden table to the metal drill press table slots, with washers, as needed between the knobs and table.

I can position and drill many small parts very accurately with this setup, once I set this table and fence for the hole position needed. I keep an air gun handy to blow chips away to assure that the next identical small part is tight against the fence and stop for the best accuracy. It helps to have a Wixey crosshair laser on the drill press too, but it's not absolutely necessary.

Charley
 

Attachments

  • DSCF0549.JPG
    DSCF0549.JPG
    1.5 MB · Views: 48
  • DSCF0550.JPG
    DSCF0550.JPG
    1.5 MB · Views: 51
  • DSCF0551.JPG
    DSCF0551.JPG
    1.3 MB · Views: 59
  • DSCF0552.JPG
    DSCF0552.JPG
    1.5 MB · Views: 56

Scott H

Scott
User
@Charles Lent

That is a neat fence and table design. I have seen the single pivot fences on some router table plans and I made a very basic one for the drill press once, but I do not think I have seen the curved table edge for them like that.

I like the idea of carriage bolts since they have a square shank section and won't spin freely -- so you only need one tool to tighten/loosen. Will have to think about whether I can apply that to mine.

Do you do anything special to back up pieces on the bottom?

Strangely my drill press has a laser but I just never really seem to use it.
 

Charles Lent

Charley
Corporate Member
Scott,

The cross hair Lasers work great, but the laser line generators need to be oriented to produce an absolute vertical line from each. Some need calibration before they will work well, if the factory doesn't do it, or they get knocked off position in shipping. This involves some dis-assembly of the laser head assembly. You will need to loosen and rotate each laser head within the body of the laser unit. Projecting the line on the back of a white rod (dowel, or other) that is chucked in the drill press gives you a target for this, but placing a small mirror on the drill press fence makes it easier to see how well this laser line is oriented on the back of the rod. A 4" exposed length out of the chuck is adequate. Adjusting it's side position is easy to do later. Just get it projecting a line that is perfectly vertical on the dowel target. Do one laser at a time. Once both project vertical, re-assemble the laser unit, clamping them so they cannot rotate within the head.

Now you can adjust the side to side position of the laser. With a tiny drill smaller than the width of the laser lines, make a hole in some piece of scrap that is clamped to the table, and assure that the table is also locked in position. Now that you know where the drill press makes the hole, turn the knobs on the laser head one at a time to get the laser lines to cross over the hole that you drilled. I lightly clamped these knobs in a pair of channel locking pliers one at a time in order to give me a larger radius swing of my hands to get a finer adjustment of the laser line position. These knobs are sticky and don't want to move easily, then they jump when you try to turn them with just your fingers. Using the pliers makes this rotation of the knob smoother and easier. Once crossing the hole in the scrap perfectly, you are ready to use them at any table height or drill bit length. When they do this well, you will find all kinds of uses for them and they will speed up your work flow.

If the lasers don't project perfectly vertical lines, when you move the table up and down the cross point of the laser lines will change position. When perfectly vertical, they will cross at the drill contact point no matter how high or low the work piece on the table or tip of the drill bit is. They are totally useless when not calibrated, but very useful when working properly. The ones that came on my new Delta Drill Press when I bought it were never used, until I figured out how to calibrate them. I have now purchased Wixey's for my other two drill press and I'm considering buying a Wixey for the Delta, because the Wixey units project better focused and finer lines than the unit that came on my Delta Floor Standing drill press.

Charley
 

Premier Sponsor

Our Sponsors

LATEST FOR SALE LISTINGS

Top