I used some 5/16" and 3/8" metal inserts for threads on this project/jig not long ago. It was in soft wood.They worked out fine.
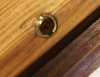
Now I need to put some 5/16"-18 in some oak on this same project.Ive tried drilling different sizes on the holes but I always pull the insert out when backing the guide bolt out...
Im using this method and it worked fine in the soft wood...
https://www.youtube.com/watch?v=tIhEqoKE8Dc
Im ready to finish this up. Help!!