Inlace question

Status
Not open for further replies.

pcooper

Phillip Cooper
Corporate Member
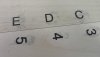
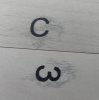
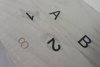
I'm trying Inlace for the first time, and would like to use it on flat surfaces instead of in turnings as do most of the projects I've seen. My first run didn't turn out as expected, but I figured I'd be learning with it anyway.

My question has to do with the color of the Inlace bleeding into surrounding wood (I used maple). Is there something that is good to seal the wood with first in order to keep the Inlace from going where it shouldn't go? Will plain sanding sealer be ok here? I'm trying to fill letters and numbers engraved in wood, they're shallow, only about 1/16" deep or slightly more.
 

Wyatt Co.

New User
Bill
Sounds like you're just trying to color the engraving and not using a filler.

The only thing that wont bleed is latex or acrylic paint.
 

pcooper

Phillip Cooper
Corporate Member
Maybe more explanation is needed, I used the Inlace kit with black coloring, and used the proper amounts for a very small mix and the proper number of drops of hardner. I filled the engraving and allowed some extra to be on the top of the engraved area, assuming that the material would dry and possibly shrink into the engraved area slightly, which it did seem to do. I then cut off the excess material to expose the engraved area where I found the bleed problem. I'll get a picture this afternoon hopefully. The thing is, I've seen this used in turnings before and there seem to be such sharp lines between the Inlace and the wood...just wondering how that is accomplished if bleeding is a problem.
 

Matt Furjanic

New User
Matt
The same problem is sometimes encountered when doing regular wood inlays, where the inlay wood is oily, like bloodwood, cocobolo or some woods in the rosewood family. Shellac and laquer, and other non-water based finishes act as a solvent and cause the inlay or inlace material to bleed into the surrounding wood. Try using a water based finish. I have also had success by using polyurethane spray as the first coat, then sanding out any bleeding. The poly spray seems to neutralize and harden the surface and subsequent finish coats do not cause the bleeding. Subsequent coats do not have to be polyurethane, but the finish of your choice...
 

KenOfCary

Ken
Staff member
Corporate Member
I've only used the coral and turquoise inlay crushed stone. It generally is put on heavy and then sanded until it just fills the engraving or holes its going into. In other words the overflow is sanded off. Not sure if this applies to your situation or not.
 

pcooper

Phillip Cooper
Corporate Member
I've only used the coral and turquoise inlay crushed stone. It generally is put on heavy and then sanded until it just fills the engraving or holes its going into. In other words the overflow is sanded off. Not sure if this applies to your situation or not.

I think we're onto something here. I had more on there than required, and wanted to sand it off. I found that sanding it off, (and even ran a very light cut in the planer) did the job to level the inlay even with the wood, but the 'extra' that I put on there and the lines of the inlay left the color bleed. My thinking is I need to coat the material with something before doing the inlay material, and the face of the wood can be covered with something like self adhesive shelf liner... but down in the engraving is different. I guess my question boils down to should I use something to seal the area I want to inlay before applying the inlay material.
 

Jeff

New User
Jeff
Pics of bleeding severity may be useful.

Is this kind of what you're doing? The products used are "Castin' Craft Clear Polyester Resin" and a hardener for polymerization.

https://www.youtube.com/watch?v=gp2eK-oUNhQ&feature=youtu.be

Why did you choose "InLace" for this experiment instead of using black epoxy? As a curious organic chemist I couldn't find much useful information about "InLace" resins but the hardener is methyl ethyl ketone peroxide so that suggests that it's a polyester (plastic) also.

http://www.inlaceonline.com

Does the resin or hardener have an irritating nasty odor? That would also fit, since epoxy mixes are almost odorless.
 

sawman101

Bruce Swanson
Corporate Member
I've done quite a few jewelry box cover inlays and didn't have a bleeding problem, however I used crushed stone in all my Inlace mixtures. I've also added powdered silver and gold flakes to the mix, again no bleeding. Is the black you used liquid, powder, or ground mineral? I would think if the coloring was crushed mineral it would not bleed, but a liquid might tend to, but I wouldn't know about the powdered form. Anyhow, I'm anxious to see you get this figured out as I do use Inlace frequently for inlays on flat work.
 

pcooper

Phillip Cooper
Corporate Member
Pics of bleeding severity may be useful.

Is this kind of what you're doing? The products used are "Castin' Craft Clear Polyester Resin" and a hardener for polymerization.

https://www.youtube.com/watch?v=gp2eK-oUNhQ&feature=youtu.be

Why did you choose "InLace" for this experiment instead of using black epoxy? As a curious organic chemist I couldn't find much useful information about "InLace" resins but the hardener is methyl ethyl ketone peroxide so that suggests that it's a polyester (plastic) also.

http://www.inlaceonline.com

Does the resin or hardener have an irritating nasty odor? That would also fit, since epoxy mixes are almost odorless.

First, I chose InLace because I ran across someone that recommended it and it had a lot of neat looking things to put into it...guess you can do that with other stuff too though. I thought it would be easy to work with also, seemed to have a longer pot life than other epoxies that I'd played with.

It does have a strong smell, and works much like the video you posted does. I'm thinking about the product that guy used too, might be something to check out. The depth of his inlay was much deeper than mine, I don't think my material would pour like his did, I used a craft stick to put it on the board. The amount of color that I used might have been too much too, hard to tell with black.

I've tried different paint products, and all seem to work about the same, not really the finish I'd like to have, doesn't fill the engraving and while it can look ok, just ins't the look I'm after on some things. I wanted to be able to engrave, fill and finish with a smooth surface on the top, not a deep cut out.

I'll post pics tonight to help out.
 

pcooper

Phillip Cooper
Corporate Member
Here are some pictures of the bleed that I'm talking about. There is one picture that has an engraved 8 that is what I would fill, to give you an idea on how deep this is.
attachment.php
attachment.php
attachment.php
 

Attachments

  • DSCN1478.JPG
    DSCN1478.JPG
    78.3 KB · Views: 145
  • DSCN1479.JPG
    DSCN1479.JPG
    60.5 KB · Views: 142
  • DSCN1480.JPG
    DSCN1480.JPG
    74.4 KB · Views: 147

Jeff

New User
Jeff
I thought it would be easy to work with also, seemed to have a longer pot life than other epoxies that I'd played with.

FYI, the InLace is a polyester, not an epoxy. Your pot life should be about 12-15 minutes for this product which is slightly less than a West System epoxy (105 resin, 206 hardener). Also, what's your guess on the apparent viscosity of your mix (like syrup, thicker like catsup, or even thicker like mayonnaise)?

That doesn't look like bleeding to my eye = diffusion of the black color into the surrounding wood which would be more uniform around the perimeter of the inlay.
Perhaps more aggressive sanding or card scraping will remove it. :eusa_thin I'd try spraying some rattle can shellac on the maple boards before the CNC routing and then apply the InLace.

BTW, finding technical details about InLace (Bryson City, NC) is like pulling teeth with no anesthesia! :eek:
 

pcooper

Phillip Cooper
Corporate Member
FYI, the InLace is a polyester, not an epoxy. Your pot life should be about 12-15 minutes for this product which is slightly less than a West System epoxy (105 resin, 206 hardener). Also, what's your guess on the apparent viscosity of your mix (like syrup, thicker like catsup, or even thicker like mayonnaise)?

That doesn't look like bleeding to my eye = diffusion of the black color into the surrounding wood which would be more uniform around the perimeter of the inlay.
Perhaps more aggressive sanding or card scraping will remove it. :eusa_thin I'd try spraying some rattle can shellac on the maple boards before the CNC routing and then apply the InLace.

BTW, finding technical details about InLace (Bryson City, NC) is like pulling teeth with no anesthesia! :eek:

The viscosity was about like syrup, I'd like for it to be thicker. I stirred it a lot in the can before using any of it and also stirred a lot after adding the color powder, and the hardener. I'd wondered about spraying on something before cutting...hadn't thought of shellac though, but didn't know if there were things that just aren't done along that line.

Agreed on finding info... I'm thinking about the West System stuff...would like to try that. This is a learning thing...but isn't it all?
 

sawman101

Bruce Swanson
Corporate Member
From your pics Phil, I have to agree your problem is not bleeding. When you sanded the very fine particles of your inlay material filled the wood pores around the inlay. I've also done inlays with polymer clay. I can have it flat on the board, but then the board has to be placed in the oven and baked. When it comes out, the clay expanded and was proud of the board. It does the same thing your inlay work does if sanded, it has to be scraped with a card scraper, or sharp chisels. Scraper works best as the chisel can dig into your work. Good luck and have fun!
 

Jeff

New User
Jeff
So you added the black color powder to the resin in the can with stirring before adding the hardener? Why didn't simply buy the black resin in the can?

The viscosity was about like syrup, I'd like for it to be thicker.

It should have poured like syrup but maybe your resin/hardener mix was beginning to thicken (polymerize) too much. InLace offers ""Thicken-it" for increasing the viscosity but that seems counter-productive. The West System epoxy is also about the consistency of syrup and I've added some of their #403 microfibers to increase the viscosity or change the color (wood sanding dust, powdered charcoal, etc).

http://www.westsystem.com/instruction-2/epoxy-basics/modifying-with-fillers-additives/
 
Last edited:

pcooper

Phillip Cooper
Corporate Member
I added the black powder to a small amount of the resin in a mixing cup, not the whole can, and also have some red powder as well, so I have clear resin in the main can still...so I guess I wasn't clear about my mixing...the 'can' was the mixing cup that I used. It does seem a bit crazy to not buy black in the can if that's what you're going for huh? :)

I did notice the thicken stuff in the instructions, but figured I didn't need that as I didn't want to hurry the time I'd have to work with it.

So, today I cut another run of these, and this time I'm trying a spray on coating on the wood before I made the cut, and will try that method as well as other suggestions. Hopefully that will help. The idea that Bruce has on what the color is also makes me think that the coating might help, as well as the scraper idea for cleaning it off to the part I want to keep.

I think I'm going to use up the InLace product and then try the other suggested product and see if it works better, from what I've read and learned so far, it might be my best option.

Thanks for all suggestions so far, and I'm open to more!!
 
Status
Not open for further replies.

Premier Sponsor

Our Sponsors

LATEST FOR SALE LISTINGS

Top