I Hate barrel bolts

JimD

Jim
Senior User
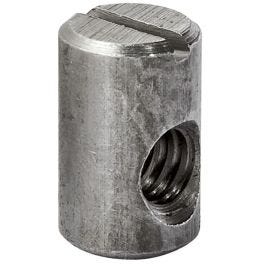
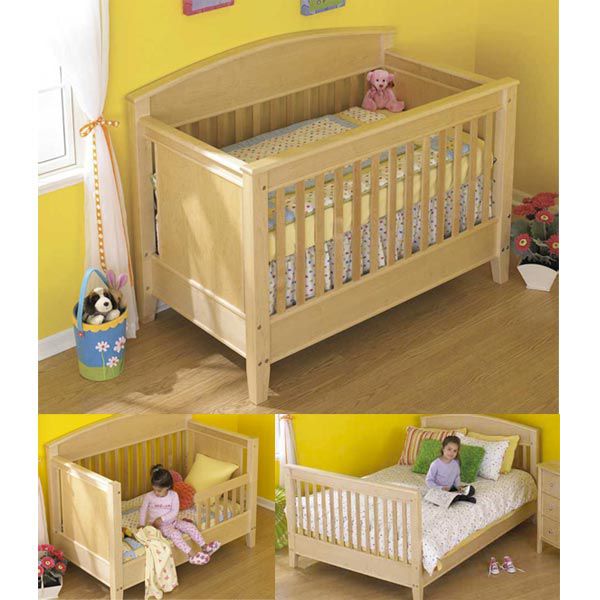
My second grandson almost got a store bought crib today. I have his nearly done but have messed around for about 6 hours installing 8 barrel bolts. You drill a little over 3/8 hole one direction for the round nut and then a little over 1/4 the other direction for the bolt. I am not pleased with the plans I bought from Wood magazine either. They are very long but make important information very hard to find. This is one of those 3 in one beds that converts from a crib to a toddler bed to a full size bed. The barrel bolts attach the head board and foot board to the ends of the crib/toddler bed and they even have the holding the bed rails. I already ditched that dumb idea. I will cut in some bed rail fasteners if they want to use it as a double bed. Simple with a router jig and a better looking more secure connection.

In the span of 8 joints I've had a couple that went together easily and a couple that almost refused to go together at all. The others were in between these extremes. Due to the design, you have to drill half the holes on the completed crib which is a significant part of the problem. It only takes about a 1/16 dimensional issue, at the far end of the hole, for the bolts to be very difficult to put in. All the holes I could were drilled on the drill press before assembly. It is the others that I am struggling with - or was. It is together now. There are a few bumps and bruises that I need to sand out before finish but it is together.

My lessons learned are to think at least twice before buying any plans from Wood again. They are not cheap and are not good. And to never use barrel bolts again. Once assembled it is a strong joint and the fasteners are not overly expensive but they are just too fiddly for this old guy to mess with.
 

Jeff

New User
Jeff
I suspect these are what Jim is talking about for the crib. Cross dowel bolts is another name for barrel bolts I think. Look at picture #5.


sawman101

Bruce Swanson
Corporate Member
Would it have helped if you had drilled each hole for both the bolt and barrel 1/32" oversize? That would, I would think, make it easier to fit them up. Haven't wrangled with the animal in many years, so my thinking may be off the mark. Also, a small magnet to hold and position the barrel might help. I have one with a handle in the shop, and it is smaller than the barrel, that is assuming you have room to use it.
 

Jeff

New User
Jeff
They are very long but make important information very hard to find. This is one of those 3 in one beds that converts from a crib to a toddler bed to a full size bed. The barrel bolts attach the head board and foot board to the ends of the crib/toddler bed

Is this your 3-in-one plan from Wood magazine?


JimD

Jim
Senior User
Yes, the cross bolts are what I call barrel bolts. Yes, it is the 3 in 1 Bed plans that I mostly followed. A magnet would have been nice but it has to reach up 1.5 inches inside a 13/32 hole (1/32 over the cross bolt diameter). I tried using a strong magnet on my screwdriver but it did not help much. I think the issue was tiny bits of tear out where I drilled the 9/32 (1/32 over the bolt diameter) hole hanging into the larger hole for the bolt. So sometimes it was a terrible struggle to get the cross bolt back out.

Drilling the larger hole last might help but I drilled them in the order the plans said to and was able to use the drill press on the parts before assembly. Particularly the hole from the bottom of the top rail would be a bear after glueup. Not drilling the bolt hole as deep as the instructions would help a lot, I think. If is easy to put the nut up past the bolt. What worked best was to get the nut hole horizontal so it could be moved more easily and precisely. That meant standing the bed on end. Without the bolts fastened. It took, literally, hours to do the 8 connections. Getting the hole exactly the right depth would be a challenge too. But at least on the bottom it wouldn't be hard to drill it another 1/8 deep (or whatever you need) on the finished frame.

The biggest issue with the plans is the 16 holes for the variable mattress height and all the holes for the barrel bolts are tiny little labels on a drawing - only. No real discussion despite lots of words about nonsense. With all the other dimensions all on top of each other. No label about what the hole is for. I knew I would not do bed rails with these connections so I did not drill those holes but had to figure out what was what. I could determine it, the information is there, but it could have been a lot easier. It would also help if they organized the material to have the crib first, then additional information on the new frame for the toddler bed, then new information for the double bed. I can't imagine anybody who wouldn't prefer that approach. They just mash all three projects together. In my case, the expectant mother is anxious for the crib (she's due mid November) so I wasn't making the other pieces at this time.

I much prefer Woodsmith plans, but I don't think they have one for a similar bed.
 

JimD

Jim
Senior User
I just bought some small cylindrical magnets off Amazon. I still have to get this back apart to spray on the finish and then assembled at my son's house. Hopefully they help.

I think the whole thing could be made with bed rail fasteners Amazon.com: Woodtek 160550,"Hardware, Furniture, Bed Hardware", 5" Bed Rail Fasteners Clear Zinc, 4-Pack: Gateway
You'd have to find smaller ones or make the top rail taller but cross bolts or barrel bolts are just a mess. The rail fasteners would also not require bolts to show on the outside of the piece. They are very strong, but do take a few minutes to inlet. With a router template, I find the installation to be pretty easy.
 

kelLOGg

Bob
Senior User
I've used cross dowels several times to avoid screwing into end grain. Alignment is tricky. As was said, I, too, drill slightly oversized for the dowel and always end up wallowing out the bolt hole. Looks good when assembled but a real woodworker, unlike me, would probably croak. My bolt holes are usually about 3" deep into the end grain and I use a small right angle square for guidance but still end up a little off.
 

Jeff

New User
Jeff
I've used cross dowels several times to avoid screwing into end grain. Alignment is tricky. As was said, I, too, drill slightly oversized for the dowel and always end up wallowing out the bolt hole. Looks good when assembled but a real woodworker, unlike me, would probably croak. My bolt holes are usually about 3" deep into the end grain and I use a small right angle square for guidance but still end up a little off.

Don't worry about it---they work once you get the hang of it and no one will see it anyway. I've looked at several articles in Fine Woodworking by well respected woodworkers (Christian Becksvoort is one) that have used these cross dowels and they make it sound dirt simple but don't say how much they struggled with them. Most have some sort of a jig that they use for alignment so it sounds fail-safe!
 
Last edited:

JimD

Jim
Senior User
The wood plans have you make a jig for the holes in the bottom rail and it definitely helps get the hole centered on the plywood of the rail but that doesn't do much for the other end of the hole where the cross dowel is. It is not hard to get a little off 1.5 inches away. I tried using the leg hole, since they are almost 3 inches deep, for alignment but then I sometimes had trouble keeping the starting point of the hole in the middle of the rail. I did not either consistently have a problem or consistently not have one. Some went very smooth but others were painful. I'm sure there are people that can do this better but I think some of the difficulty is just inherent with these fasteners.
 

JimD

Jim
Senior User
I like things Woodpeckers makes but it has always been too pricey for me. In the case of this crib, it could have helped but only if you do things in a much different order than the plans. They have you drilling the 2 3/4 by 2 3/4 legs for the bolt, drilling the rails on the end pieces for the nut before assembling the ends and then drilling the rails for the bolt at the end of the project after the pieces are assembled. This jig could do the two rail holes, maybe, but you would then have to drill the leg holes last based upon the finished ends and their hole spacing. That means making the ends first, not the headboard and footboard first. I say the jig could maybe be used because the top rails are pretty narrow and have both rails have bottom molding on them that you drill through for the nut hole. I think they would have to be drilled before molding application to use the jig. But you drill through the molding on the bottom of the rails for the nut and the molding is proud of the surface of the plywood. So I don't think the pricey Woodpeckers jig will work without a change to the design.

The jig might help but I think the key change would be to make the ends first. I think that is the main thing that could work a lot better. If you drilled these pieces wrong before it was all assembled, no big deal, you scrap some pieces of plywood and a little molding. They are relatively small pieces that you do not have much work in. You could make the nut holes the right depth where you couldn't push the nut past where it goes for the bolt to intersect. The holes on the legs could still be drilled before the head board and foot board are assembled, you'd just have to make the ends first and then use dowel centers in the bolt holes of the ends to mark the hole positions on the legs. Really you could do one leg hole and just put a bolt into it and use a dowe center to mark the other hole. The legs could be drilled on the drill press so the hole would be straight and perpendicular to the surface (as they are in the Wood plans). If you do the rails for the ends first, you could just drill both those holes on the drill press if yours is big enough or use a doweling jig for the bolt holes along the length of the rail. And if they don't line up well enough, cut another piece of relatively inexpensive plywood and try again. You'd have to remake the bottom molding but it is not huge and there is still not a lot of work in it at that point. And the probability of an issue is much smaller working with a relatively simple piece.

When you start having to redrill pieces that are totally assembled with solid wood trim on them, you have a lot more time and energy in them and I was reluctant to scrap them - and the issues are almost totally invisible when the bed is assembled so scrapping is not really necessary.

Maybe the issues are more with the plans than the fastener. But if I ever use these fasteners again I will change something, at least the order of the hole drilling so I am not having to drill holes that have to line up in the ends of the rails of completed pieces. That was a dumb idea. I got a long drill bit so I could mark the hole position in the rail but getting the rail exactly centered over the leg holes was one of the issue. I consider $25 for plans somewhat pricey and when I spend that much on plans, I think they should be well thought out and minimize the possibility of issues like this. Instead these plans seem designed to create the very issue I had.
 

drw

Donn
Corporate Member
I looked into this once when researching cross dowels. Woodpeckers Universal Cross Dowel Jig Didn't get one myself.
That is a pretty cool jig! I don't recall ever needing to use cross dowels, but if I needed to make this joint, and considering the frustrations JimD has experienced, I would be tempted to get one. It definitely has a "Woodpecker Price Tag", but the Woodpecker products I have purchased are quality tools.
 

junquecol

Bruce
Senior User
Make your own, using TWO plunge routers, each equipted with a guide bushing, and a bit for either size hole. In my experience, drilling into end grain with a drill bit is a sure way to learn some new words that you can't use in mixed company
 

Willemjm

Willem
Corporate Member
I use cross dowels often, never had a problem. I have a corded drill with a built in spirit level.

I think folks are over complicating this.

Even if the hole drilled is not straight or square they still work just fine. I use a long wooden dowel in the drilled hole which will carry the bolt to line things up and then a ruler across the center line of the wooden dowel to draw a center line with a pencil. Then just measure carefully and drill the hole for the cross dowel and drill it bigger than the cross dowel diameter.

I have never used a jig either.
 

JimD

Jim
Senior User
Willem,

You can't go too far oversize on the hole for the cross dowel in this case because it is 3/8 diameter and goes into the edge of nominal 3/4 plywood, really about 23/32. The plans call for 13/32 holes which leaves 5/32 walls - just over 1/8. I enlarged the bolt holes when I had to, they are 9/32 for the 1/4 bolt. So going a little larger does not significantly weaken the rails. I did not enlarge the dowel hole, 5/32 is thin enough walls.

With or without a jig, I think the key lesson learned for me is to drill the intersecting holes as early in the project as possible. Get them working before you make the project big and complicated to line up properly. Lining things up height wise in this project is extra challenging because the ends are not flush with the headboard or footboard, all four sides of the crib have six pieces vertically joined together so small dimensional differences can move the distance between holes, the bolt size is kind of large for the rail thickness and you can't really line up the drill bit with the hole center line on the completed crib because you can't easily see it. I also trusted too much that the plans were well thought out - and IMHO they are not.

Jim
 

CrealBilly

New User
Jeff
I fought this battle and won. Once you get the barrel bolt aligned (dab of thick CA on end of dowel), with the screw in, shoot some warm silicone in the hole you inserted the barrel bolt in. I just back sawed the dowel rod off flush but you could try and break the CA bond with the screw still threaded in and remove the dowel) Don't remove the screw until the silicone dries. This is enough to hold the barrel bolt in place for easy screw removal and insertion.
 
Last edited:

JimD

Jim
Senior User
Interesting idea Jeff. I got the magnets I ordered last night and used them to break the crib back apart so I can spray on the finish. The magnets were helpful for disassembly. They hold the nuts well. I need to use at least two for them to be long enough but that worked out because the depth the nut needs to go into the hole is just a fraction more than the length of one of the magnets. That will ease insertion during reassembly. I put a little putty into the two holes that look the worst and will do some final sanding on the entire crib before applying finish. I sanded it prior to assembly but a couple weeks in the moist SC air and the handling for assembly mean it could use another light pass.
 

Alan in Little Washington

Alan Schaffter
Corporate Member
Instead of drilling a hole for the cross dowel nut from the inside or outside surface of the rails, I drilled a deep cross grain hole up from the bottom edges of the rails, stopping before reaching the top edge of the rail. The distance from the end of the rail depended on the length of the attaching bolt and thickness of the bedpost. I used cross dowel nuts like the ones shown below from Rockler- two at each end of both rails. I used a magnet (or a dowel with a dot of double sided tape if the dowel nut is brass) to position the the top cross dowel nut (vertically) along the width of the rail, sliding it up from the bottom while making sure the slotted end was is facing down so I could rotate it with a screw driver. I temporarily inserted the attaching bolt through the top hole I had drilled in the endgrain. Then, to keep the dowell nut in the correct vertical position (keep it from sliding down), I glued a short piece of dowel in the hole. I installed the lower cross dowel nut the same way. I used a second dowel to plug the hole and keep the lower dowel nut positioned vertically. It worked just fine and makes a neat rail attachment that won't pull out. The only downside is that the bolt heads are visible on the outside of the bedposts. So, for a neater appearance and lower profile, I used flat, socket-headed connector bolts (see pics), also from Rockler (you can also put a shallow counterbore in the bedpost), instead of the larger, more industrial looking hex head bolts shown in the first pic. One caution- double check the threads are the same on the cross dowel nuts and bolts- Rockler's heavy duty dowel nuts shown in the first photo have 1/2" x 12 threading, the connector bolts have smaller and more common 1/4" - 20 thread which are plenty strong enough. Rockler, also sells cross dowel nuts with 1/4" - 20 threads, as do other sources, like Lowes, etc. Also, watch out for the random metric cross dowel nut. If you use the socket-headed bolts, don't forget to get an extra allen wrench for the recipients of the crib/bed.

Dowel nuts
36073-03-1000.jpg


Connector bolts:

31831-04-1000.jpg
 

Premier Sponsor

Our Sponsors

LATEST FOR SALE LISTINGS

Top