I recently built a spice box that needed a fairly large ( for the size of the piece) crown moulding at the top. The case is solid dovetailed and would expand and shrink over its 12 inch depth. One way to handle the crossgrain of the crown is to glue on the moulding at the front of the case and nail or pin-nail at the back to allow for movement. That would prevent the case side from splitting over time but eventually the moulding would be loose enough to be sad looking. I read about the sliding dovetail method in Becksvoort's book on Shaker furniture and decided to try it. It is not that much extra trouble if you make the dovetail slot in the back of the moulding first and then make the tail to attach to the case by sneaking up on the fit using router table and the same bit as made the slot.

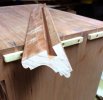
 I cut the dovetail slot by first plowing a straight slot on the table saw to give some relief for the dovetail router bit to work cleanly.

 The poplar dove tail strip is made by starting with a board planed to the maximum width of the tail then run one side vertically past the dovetail bit at the same depth as the slot and just deep enough to cut the full dovetail profile on one side. Then to profile the other side start a little wider than the dovetail slot and sneak up on a tight slide fit by matching the tail to the slot. When it just barely slides in you are good.
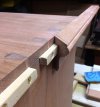
If there is a trick it is to mark and attach the dovetail to the case as one strip at the right depth so your moulding trues up where you want it. Rip off the dove tail from the board so it is just the right depth for the slot. Then hand plane off a thin shaving from the case side so the tail strip is just thinner than the slot is deep. That way it will be tight when you slide the moulding on. Then attach the strip at several places as in the photos. Last step is to chisel out breaks in the strip so it can move as independent pieces with the case. ( I wish I had a photo of this step to add, but I don't-- I forgot --what you see is after the strip has been attached to the case and chiseled into sections to allow movement.)
When you slide the moulding on make sure it is tight but movable along the full length--then glue it only near the front of the case and at the front miter..


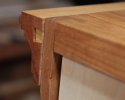
 Last photo shows how the finished joint looks from the rear of the case. You can see the case has shrunk a bit (about 1/16") since i brought the case into the heated and dry house environment. When I finished the case a while back the moulding was planed flush with the case.

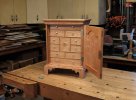
 Heres the finished box

 I cut the dovetail slot by first plowing a straight slot on the table saw to give some relief for the dovetail router bit to work cleanly.
 The poplar dove tail strip is made by starting with a board planed to the maximum width of the tail then run one side vertically past the dovetail bit at the same depth as the slot and just deep enough to cut the full dovetail profile on one side. Then to profile the other side start a little wider than the dovetail slot and sneak up on a tight slide fit by matching the tail to the slot. When it just barely slides in you are good.
If there is a trick it is to mark and attach the dovetail to the case as one strip at the right depth so your moulding trues up where you want it. Rip off the dove tail from the board so it is just the right depth for the slot. Then hand plane off a thin shaving from the case side so the tail strip is just thinner than the slot is deep. That way it will be tight when you slide the moulding on. Then attach the strip at several places as in the photos. Last step is to chisel out breaks in the strip so it can move as independent pieces with the case. ( I wish I had a photo of this step to add, but I don't-- I forgot --what you see is after the strip has been attached to the case and chiseled into sections to allow movement.)
When you slide the moulding on make sure it is tight but movable along the full length--then glue it only near the front of the case and at the front miter..


 Last photo shows how the finished joint looks from the rear of the case. You can see the case has shrunk a bit (about 1/16") since i brought the case into the heated and dry house environment. When I finished the case a while back the moulding was planed flush with the case.
 Heres the finished box