Coat Rack Tree Design Build

Chiefifd32

Ed
User
Hi All....
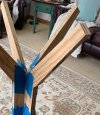
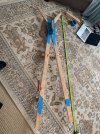
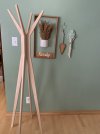
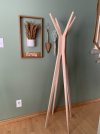
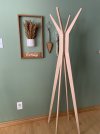
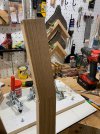
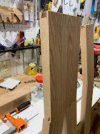
I'm looking for ideas how to go about building a Coat Tree. It would have four legs that form the base. The legs would gently tapered, and come together for attachment. Then the four legs simply spay out at a slight angle to form four posts for coats/hats.
If anyone has made such a coat tree, I'd be very interested how you went about it.
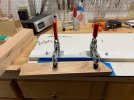
This seems pretty simple, but making a solid connection of the 4 legs ..... just looking for help.
The is a project for my son, he asked me to created this for his new house.....
Thanks everyone, looking forward for any and all ideas.....
Ed
 
Last edited:

bob vaughan

Bob Vaughan
Senior User
Google "clothes tree by Christian Becksvoort" He made a really simple and easy one.
Google images for coat rack tree show a bewildering array.
 

Chiefifd32

Ed
User
Thanks Bob, I've made similar ones to Christian's, and they are pretty easy.
This one he's looking for would be made from four poles (for lack of a better term) coming together probably 85% of the way to the top and curve up and outward.
I've been searching for ideas how to firmly attach the four poles.........with somewhat hidden fasteners....
 

bowman

Board of Directors, Webmaster
Neal
Staff member
Corporate Member
This belonged to my grandparents.
20230116_080348.jpg
 

Chiefifd32

Ed
User
Yup! This is very close to what my son is looking for. Just no metal hooks, just the wood poles curving out slightly to use as hooks.
This gives me another idea or two, I know there are lots of designs out there...but this helps.
After sleeping on it....I know the width & height my son wants. I'm gathering a long sheet of scrap cardboard, laying out the rough outside dimensions. I'm kinda "sketchy" on laptop drafting type programs.......& I want a full-size mock-up where the four legs come together to try a few ways to attach them.
 

Chiefifd32

Ed
User
I made a very rough mock-up of the coat tree.
I'm thinking about trying sliding dovetails to attach the legs and the top hangars.
I still may use dowel pins, but the glue & clamp-up might necessitate a little thought.
 

Attachments

  • IMG_3815.jpg
    IMG_3815.jpg
    74.9 KB · Views: 83
  • IMG_3818.jpg
    IMG_3818.jpg
    203.3 KB · Views: 79

llucas

luke
Senior User
VERY NICE! The simplicity of design belies the challenge of construction. Thanks for sharing
 
Last edited:

Chiefifd32

Ed
User
Here are a few photos before assembly. Fine chiseling and sanding were still needed before and after the final glue-up. Not sure if this gives a better understanding of the angles involved and the sliding dovetails. Oh, the legs and tops were tapered prior to the glue-up using a tapering jig.........
I hope this helps answer your question....
 

Attachments

  • IMG_3833.jpg
    IMG_3833.jpg
    155.9 KB · Views: 65
  • IMG_3830.jpg
    IMG_3830.jpg
    144.6 KB · Views: 68
  • IMG_3831.jpg
    IMG_3831.jpg
    18.3 KB · Views: 68

AllanD

Allan
Corporate Member
Thanks. So the dovetails were used to join the uppers and lowers. I was trying to make harder and thought that was how you joined the legs to each other. How was that done, just face grain glueing?
 

Chiefifd32

Ed
User
Yes, as the sliding dovetails for the legs and arms were slid into the "center X" female dovetail for lack of a better term. They were made to have a tight fit. When all parts were dimensioned, I put it together, it was pretty solid without any glue at all.
I place two of my heavy coats on the same side of the stand and it was rock solid on the floor, again before glue-up. I didn't need any clamping as the dovetails were doing their job of securing the tops and legs to the middle "X" fairly securely. "gentle taping to get them in, but dovetails should slide pretty well as long as your parallel to the female dovetail". Don't force or hammer it in or you'll probably chip out a dovetail........
I only used masking tape on the bottom of the legs to gently adjust the spacing of the legs to get proper alignment and spacing.
The "Center X Cross"I used 3 or 4 dowel pins to align the glue-up.
Hope this helps
 

Premier Sponsor

Our Sponsors

LATEST FOR SALE LISTINGS

Top