
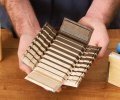
Years ago, I found a picture showing how to cut a rectangular miter-fold box. The concept is straightforward – cut miters almost, but not quite, through the wood, leaving a thin, foldable outer skin. Fold the box and glue it, and you’re done.
I had forgotten the miter-fold concept while I spent my time learning to make carved brass medallions and monolithic wooden boxes out of a single block of wood on the CNC machine, then putting the two together to come up with metal-inlayed boxes. I loved the result, with one troubling exception. Those blocks of wood, usually walnut, cherry or padauk, made for nice looking boxes, but the process of hollowing out a solid block to make the box left a disturbingly large pile of sawdust on the floor – sawdust that had once been beautifully grained (and sometimes expensive) hardwood.
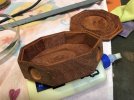
Always thinking, as wood-guys do, about better ways to build things, I remembered the miter-fold technique that yielded nice rectangular boxes, and wondered if it could be successfully used to build some irregular-shaped boxes, with maybe 8 or 12 sides. While doing the research, I discovered that turners work with cutting the angles necessary to glue up blocks to put on the lathe. But I could find almost nothing about making a simple 8-sided box using the miter-fold technique. After messing with it for a while (and adding several poorly done pieces to the pile of shame in the corner of the shop,) I was successful at producing something that I didn’t mind showing to other wood guys.
Construction steps
1. Decide on the size of the finished product. There is a math formula to help decide the length of the individual segments, which, when cut at a particular angle, will yield a particular size box. I decided on an 18-inch work piece that, when cut into 8 sides, gives a box around 5.5 inches in diameter.
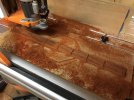
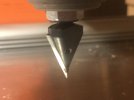
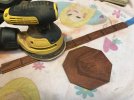
2. The "Sides" work piece gets cut twice on the CNC, once to put pockets on one side to hold the small brass tokens, then it is turned over and the miters are cut, along with a groove around the piece to fit the bottom and lid.
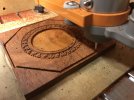
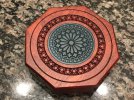
3. The bottom and lid pieces are cut on the CNC. The bottom is a simple plug that fits in the groove in the "Sides" piece, leaving about 1/16 inch exposed to form the actual base of the piece. The lid is more complicated, as it needs to get the 8-sided lip on its bottom, to fit the sides of the box, then on the other side, the cavity to accept the 3-inch brass medallion and the outer edge cuts and bevels. This was probably the most difficult part, because in order to have it fit right, the lip on the bottom and the outer edges and designs on the top must be indexed essentially perfectly. If they are off by even 1/64th, it will look sloppy and poorly done (don’t ask how I know this.) To ensure precision, I made a tiny indexing hole in the lid piece, and used it to zero the X and Y axis of the CNC, so both top and bottom cuts were exactly aligned. The little hole was filled during finishing, and is essentially invisible.
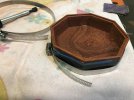
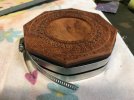
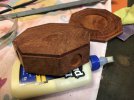
4. With Top, Sides and Bottom cut, it is time to glue the miters and fit them around the top and bottom pieces. To clamp them, I used a couple of worm gear hose clamps, which worked well. I glued the bottom piece, as it is permanent, and set the lid in place without glue, to make sure that the sides glued straight up and down.
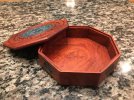
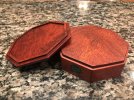
5. Finally a little bit of sandpaper clean up, and it is pretty much done. The medallion and small tokens were just glued into their cavities. I finished the Padauk with a couple coats of Tung oil, then 3 or 4 coats of lacquer on the whole thing, including the brass pieces.
Anybody else ever try this? It’s been a fun project.
I had forgotten the miter-fold concept while I spent my time learning to make carved brass medallions and monolithic wooden boxes out of a single block of wood on the CNC machine, then putting the two together to come up with metal-inlayed boxes. I loved the result, with one troubling exception. Those blocks of wood, usually walnut, cherry or padauk, made for nice looking boxes, but the process of hollowing out a solid block to make the box left a disturbingly large pile of sawdust on the floor – sawdust that had once been beautifully grained (and sometimes expensive) hardwood.
Always thinking, as wood-guys do, about better ways to build things, I remembered the miter-fold technique that yielded nice rectangular boxes, and wondered if it could be successfully used to build some irregular-shaped boxes, with maybe 8 or 12 sides. While doing the research, I discovered that turners work with cutting the angles necessary to glue up blocks to put on the lathe. But I could find almost nothing about making a simple 8-sided box using the miter-fold technique. After messing with it for a while (and adding several poorly done pieces to the pile of shame in the corner of the shop,) I was successful at producing something that I didn’t mind showing to other wood guys.
Construction steps
1. Decide on the size of the finished product. There is a math formula to help decide the length of the individual segments, which, when cut at a particular angle, will yield a particular size box. I decided on an 18-inch work piece that, when cut into 8 sides, gives a box around 5.5 inches in diameter.
2. The "Sides" work piece gets cut twice on the CNC, once to put pockets on one side to hold the small brass tokens, then it is turned over and the miters are cut, along with a groove around the piece to fit the bottom and lid.
3. The bottom and lid pieces are cut on the CNC. The bottom is a simple plug that fits in the groove in the "Sides" piece, leaving about 1/16 inch exposed to form the actual base of the piece. The lid is more complicated, as it needs to get the 8-sided lip on its bottom, to fit the sides of the box, then on the other side, the cavity to accept the 3-inch brass medallion and the outer edge cuts and bevels. This was probably the most difficult part, because in order to have it fit right, the lip on the bottom and the outer edges and designs on the top must be indexed essentially perfectly. If they are off by even 1/64th, it will look sloppy and poorly done (don’t ask how I know this.) To ensure precision, I made a tiny indexing hole in the lid piece, and used it to zero the X and Y axis of the CNC, so both top and bottom cuts were exactly aligned. The little hole was filled during finishing, and is essentially invisible.
4. With Top, Sides and Bottom cut, it is time to glue the miters and fit them around the top and bottom pieces. To clamp them, I used a couple of worm gear hose clamps, which worked well. I glued the bottom piece, as it is permanent, and set the lid in place without glue, to make sure that the sides glued straight up and down.
5. Finally a little bit of sandpaper clean up, and it is pretty much done. The medallion and small tokens were just glued into their cavities. I finished the Padauk with a couple coats of Tung oil, then 3 or 4 coats of lacquer on the whole thing, including the brass pieces.
Anybody else ever try this? It’s been a fun project.
Attachments
-
 1 Miter-Fold Rectangular Box.jpg97 KB · Views: 255
 -
 2 Sides piece, cutting miters.JPG1.7 MB · Views: 197
 -
 3 45 degree V-bit, to cut miters in Sides piece.JPG897 KB · Views: 187
 -
 4 Cutting the lid.JPG1.3 MB · Views: 173
 -
 5 Sanding the sides and base plug.JPG1.6 MB · Views: 178
 -
 6 Side miters and bottom glued, clamped.JPG1.5 MB · Views: 182
 -
 7 Lid is set in place, to ensure true gluing.JPG1.4 MB · Views: 171
 -
 8 Glued box, top.JPG1.5 MB · Views: 159
 -
 9 Glued Box, bottom, with extended base.JPG1.5 MB · Views: 162
 -
 10 Finished box, from the top.JPG1.7 MB · Views: 163
 -
 11 Finished box, from the bottom.JPG1.9 MB · Views: 175
 -
 12 Finished lid detail.JPG1.7 MB · Views: 165
 -
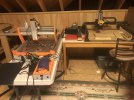 13 Stepcraft & XCarve machines.JPG1.6 MB · Views: 163
 -
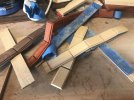 14 Pile of Shame.JPG1.8 MB · Views: 185