I am in the process of designing a gun cabinet for my father and am not sure which way to go with it. The base cabinet will have a face frame and the sides will be raised panel. When looking at the stile widths, should I include the thickness of the face frame with the forward stile for asthetic reasons, or make the stiles the same width and then have the extra 1/2" to 3/4" of the face frame sticking out the front? My original thought is to include the thickness as part of the width of the stile. My only concern with that is having the edge grain visible with the face grain of the stile. I will make sure the rails and stiles are straight grain, but i am sure it will still be obvious. Also, let me mention that I am building this cabinet out of walnut. The upper cabinet will also have raised panels on the sides and it will only be 12" in depth. I was thinking about 2 1/4" for my stiles.

You are using an out of date browser. It may not display this or other websites correctly.
You should upgrade or use an alternative browser.
You should upgrade or use an alternative browser.
Cabinet Design Question
- Thread starter TominZebulon
- Start date
- Status
- Not open for further replies.

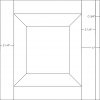
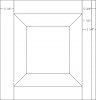
Dave, that is what I plan to do, but my question is whether or not to include the thickness of the face frame as part of the width of the stile on the side panel. Let me try to explain myself better, because I think I confused even myself in my earlier post. The side of the cabinet will be a raised panel. I am thinking about making my rails and stiles 2 1/4" wide. The total depth of the cabinet will be ~ 16". If my make my forward stile 2 1/4", then add the 3/4" face frame to the the front of that, the total width would be 3" and the rear stile will be 2 1/4". OR, should I make the forward stile 1 1/2", making the total width 2 1/4", equal to the rear stile? I'm still not sure I am explaining myself very well!!!:BangHead: I will try to draw something up and get it posted and maybe that will explain it better. Thanks for trying to answer that vague and confusing question though. Give me a couple hours and I will try to get a better explanation posted!
Tom, I would recommend adding the thickness of the front face frame to the stile of the side face frame so it would give the appearance that both front and side styles are the same width. Another option if you are concerned about the end grain showing next to the side stile would be to miter your corners. You could reinforce your miter joints with either biscuits, a full length spline, or by using a lock-miter bit router bit.
D L
D L
If you let the face frame over lap the side stile by about 1/8", leaving both stiles the same width will look ok, and so will making the side corner stile smaller by the thickness of the face frame. However, you may want to miter the face frame stile to the side panel stile (it is not as hard as it sounds), but assemble this (these) corner(s) first, then make the rest of the side and front. This allows you to move the boards to get a tight miter, which may not be possible after making the whole side or front panel and then joining them. Or you could make the whole panels first (making sure it is dead flat), leaving the corner stiles long, and then ripping them to size on the table saw at a 45 (need a decent fence). You may want to spline or biscuit the miters. I know that glue and brads should be plenty strong enough, but I still do a little overkill.
I did this for a built in dressing room. I've also made the corner stiles first, then assembled the panels on an onsite job for an entertainment system. Sorry I didn't have my digital camera then.:-(
I did this for a built in dressing room. I've also made the corner stiles first, then assembled the panels on an onsite job for an entertainment system. Sorry I didn't have my digital camera then.:-(
Tom, now your question is very clear. You have received some good answers. But I'll throw in my .02 worth. On that desk I cut the side stiles 3/4" less than the front face frame, so the combined thickness would be equal. I don't think that there is a right or wrong way to go about it. Either way will work, it is just a matter of personal preference.
Dave")
Dave
I never really considered the idea of mitering the two together because I did not even think about assembling them before gluing up the panels and face frame separate. How hard would this be on the upper cabinet that is ~ 55" tall? I think I may try a practice glue up like this first on some poplar or something to try it out! And what is the best way to clamp something like that? I have only tried one or two glue ups of miters and they were on short pieces that were easier to control as I clamped them. If I were to do something this large, should I use white glue or something for a longer open time? This is my first project of designing from scratch. I could not find any plans that I liked, but saw a picture of one for sale that looked really nice. It was in oak, but I am going to try it in walnut. I am sure I am going to have lots of questions as I progress through it and thanks to everyone who has answered so far and will in the future!
M
McRabbet
Tom,
If you miter the corners, use a spline or biscuits (either set close to the inside corner) and use longer open-time glue like Gorilla. For clamping, you could use band clamps around all four sides or make 45 degree clamping blocks to allow clamps to pull across corners. Be sure you clean off any squeeze out before glue dries or finish may be uneven.
If you miter the corners, use a spline or biscuits (either set close to the inside corner) and use longer open-time glue like Gorilla. For clamping, you could use band clamps around all four sides or make 45 degree clamping blocks to allow clamps to pull across corners. Be sure you clean off any squeeze out before glue dries or finish may be uneven.
Tom if you decide to go with the bottom example in your drawing, I would make the other side the same width.
BTW how did you do that drawing, it's very good. I've penned stuff and scanned it in but that looks like you generated it electronically..CAD or something like it.
Dave
BTW how did you do that drawing, it's very good. I've penned stuff and scanned it in but that looks like you generated it electronically..CAD or something like it.
Dave
Just to add my .02, I would miter them with a spline. The biggest challenge with this glue up isn't strength of the joint, It's maintaining alignment. Biscuits are good but even spaced closely, you will fight them some. If your stock is flat (critical for this joint) the spline will make it easy. Make corner clamping block out of scrap and glue them on with paper in between the block and your wood. It will be strong enough to pull the joint closed but a single blow with a mallet will knock them off cleanly. Several band clamps would be another good option. Slow setting glue would make life easier. Fill any gaps with a mixture of glue and sanding dust from your walnut. Mountaincrafts suggestion for gluing these up first would make life easier.
Another option that would change your design some would be to have a 45 deg. miter on the corners of the cabinets. In that approach you only miter the corner piece and your face frames stay square. You line up the back edges and leave the "points" proud. After the glue dries you plane the points flush moving the joint away from the visual miter and leaving a perfectly clean corner. Below is a cabinet from my kitchen using this approach.

Another option that would change your design some would be to have a 45 deg. miter on the corners of the cabinets. In that approach you only miter the corner piece and your face frames stay square. You line up the back edges and leave the "points" proud. After the glue dries you plane the points flush moving the joint away from the visual miter and leaving a perfectly clean corner. Below is a cabinet from my kitchen using this approach.
Couple of "different" thoughts: Make the corners out of one 2 1/2 x 2 1/2 piece in an "L" shape and set the panels in slots in the edges, no mitres or joining to do.
or put a distinctive line between the face frame and the side stiles, similar to MC's idea of over hanging the edge, but you could do as little as bevel the side of the stile and the back edge of the face frame to creat a shadow line between the two.
If you go with the mitres I would second Steves idea of the full length spline (or nearly) and stuck on clamping blocks.
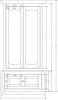
Dave, I have Corel Draw 7.0 and have used it for a few years. I wish I had CAD because it would be a whole lot easier, but that is just too expensive for what I do. I came up with some drawings of the cabinet this a.m. and will try to post them later. I have to add some dimensions to it and try to get a side view drawing done. BTW, can someone tell me how to resize a .jpg so that I might be able to post it? David, I like your idea of doing a corner post. That may be the easiest of all! I am going to East Wake Hardwoods to see what kind of walnut stock Roger has available and try to come up with something. Again, thanks to all for your great ideas! I will keep you updated, maybe with some pictures, as I go. This will be my first foray into raised panels, so this whole project will be a learning experience.
M
McRabbet
Tom,TominZebulon said:BTW, can someone tell me how to resize a .jpg so that I might be able to post it?
Use MS Paint (found under Programs/Accessories). Open your .jpg file and click on Image for options and select Stretch/Skew. Change Stretch for both X an Y to whatever % you want; say 50% and save the file under a new name. Easy...:eusa_danc
Rob
OK, another question. In reference to the glue blocks a couple people have mentioned, I am having a hard time picturing it in my mind. Can someone help me out? I understand the paper between the block and the piece. Does anyone have any pictures of a glue up like this?
M
McRabbet
Tom, Here is a good diagram from the June 2005 Issue of Fine Woodworking, as shown at the bottom of page 38.TominZebulon said:OK, another question. In reference to the glue blocks a couple people have mentioned, I am having a hard time picturing it in my mind. Can someone help me out? I understand the paper between the block and the piece. Does anyone have any pictures of a glue up like this?

This is in a good article on Clamping by Gary Rogowski. He recommends making the angled cauls shown in the diagram and photo and gluing them with hot-melt glue, double stick tape or even a thin bead of yellow glue [recommend you use Steve D's method with paper]. Make sure the cauls are a softer wood than your project wood so it will fail after you break the joint carefully with a chisel. He also suggests a preliminary coat of glue -- called size -- on the end-grain in the miter joint to close up the porous end grain.
Hope this helps.
Rob
Last edited by a moderator:
Rob, that is exactly what I was looking for! Thanks! I guess that is one of the issues I missed when I let my subscription run out. I think that is the method I will end up using unless I can find some straight grained 12/4 walnut stock somewhere close. Thanks again to everyone who took the time to offer suggestions. That is one thing I like about this forum that seems to be lacking in others. A question can be asked and answered without ridicule, allowing the free exchange of ideas. Thanks again!
- Status
- Not open for further replies.
Premier Sponsor
Our Sponsors
LATEST FOR SALE LISTINGS
-
 SOLD -- $75: Gast moa v113 Vacuum Pump Veneer, 60" bag and board
- Started by peterdnight
- Replies: 1
-
GONE: Gladiator 5 cleats, 10 hangers, Paper Towel and Shelf
- Started by peterdnight
- Replies: 3
-
SOLD -- $100 Makita mac700 portable air + grex pin nailer + 2 others + 50' hose
- Started by peterdnight
- Replies: 1
-
-
