My kitchen is finally done, had to wait for the builder before I could do the final trim.
I'll post up pictures and some notes for those interested in doing this themselves in the future.
Except for the slides and the hinges, everything else came out of my shop, which was still a work in progress, hence slowing me down a little.
Build time, 6 weeks.
Installation 1 week.
I got three bids for this before deciding to do it myself, from high to low they came in at 39k, 34k and 31k.
My costs for all materials, slides, hinges, finishing materials was around 5 1/2k and I had to hire occasional help to handle the heavy stuff, moving around and help install. That came to roughly 1k, so total costs was around 6 1/2k
Lumber used, Black Cherry, for the doors, face frames, molding, drawer fronts, columns etc. Case work was a mix two and one side pre-finished 3/4 Maple ply. Drawers and shelving trim were American Beech, with pre-finished 1/4 Maple ply bottoms.
The range hood, still has it's protective plastic in place, we will clean up later.

No shoe molding used, I scribed the toe plates to the floor and used bracket feet for extra trim.
Finish was two part conversion varnish sprayed with a compressed air HVLP gun.

The center island columns were turned on the lathe, 16/4 Cherry glued up from 8/4 boards.

The shelves are pre-finished Maple ply, with a solid American Beech trim edge. They are all adjustable. The doors and drawer fronts are raised panel (not bevel panel, the panels stand proud of the frame)

The upper case base molding was milled on my teeny wheenie 3hp Grizzly shaper, one pass with a power feeder.

The upper case crown molding was milled in four passes on my 7.5 hp shaper, using a molding head and home custom ground cutters. The front took two passes to get the different profiles and the back took two passes to get the crown angles on the back. For the front I had to make a special fence/jig so the power feeder could handle it.

Some of the shelves are on slides, using 175 degree no protrusion door hinges.

The best space utilization I could get for this dead corner, was a massive pantry, using pie-hinged doors. I had to build, assemble, take apart and re-assemble in the house due to the size.

Tip-out tray in stainless, for the sink false drawer.

The trash cans are as big as I could fit under the island. They slide on 135lb Blum Blue motion smooth as silk.

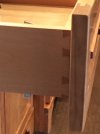
Drawer dovetails were milled with a Leigh dovetail jig. There are no nails or screws in the drawers, everything glued up.

Cope and stick was done with a 1/2" tonge and groove, as opposed to the standard 3/8", to give a little extra glue area.
Some more notes:
All the lumber was milled from rough sawn 4/4, so my face frames and doors ended up around 7/8" rather than the standard 3/4" used in cabinet construction. I did not want to waste this pretty Cherry into more sawdust. Each part was cut from the rough sawn and then jointed, and planed perfectly flat. Compared to dimensioned lumber used by most cabinet makers, my doors turned out completely flat. When placed on a flat surface, it was almost as if air pressure held the door panels down.
There was no tint, or stain in the finish. IMHO, if one can get high quality Cherry it is gold and the natural color should be preserved.
Finally, my builder is trying to line me up for three kitchens, but I think I will be giving that a rain-check. It is not a one person job and I don't want to employ people. Also, I do not find cabinet work as rewarding as taking the time to design and build a high end piece of furniture.
Thanks for looking and reading.
I'll post up pictures and some notes for those interested in doing this themselves in the future.
Except for the slides and the hinges, everything else came out of my shop, which was still a work in progress, hence slowing me down a little.
Build time, 6 weeks.
Installation 1 week.
I got three bids for this before deciding to do it myself, from high to low they came in at 39k, 34k and 31k.
My costs for all materials, slides, hinges, finishing materials was around 5 1/2k and I had to hire occasional help to handle the heavy stuff, moving around and help install. That came to roughly 1k, so total costs was around 6 1/2k
Lumber used, Black Cherry, for the doors, face frames, molding, drawer fronts, columns etc. Case work was a mix two and one side pre-finished 3/4 Maple ply. Drawers and shelving trim were American Beech, with pre-finished 1/4 Maple ply bottoms.
The range hood, still has it's protective plastic in place, we will clean up later.
No shoe molding used, I scribed the toe plates to the floor and used bracket feet for extra trim.
Finish was two part conversion varnish sprayed with a compressed air HVLP gun.
The center island columns were turned on the lathe, 16/4 Cherry glued up from 8/4 boards.
The shelves are pre-finished Maple ply, with a solid American Beech trim edge. They are all adjustable. The doors and drawer fronts are raised panel (not bevel panel, the panels stand proud of the frame)
The upper case base molding was milled on my teeny wheenie 3hp Grizzly shaper, one pass with a power feeder.
The upper case crown molding was milled in four passes on my 7.5 hp shaper, using a molding head and home custom ground cutters. The front took two passes to get the different profiles and the back took two passes to get the crown angles on the back. For the front I had to make a special fence/jig so the power feeder could handle it.
Some of the shelves are on slides, using 175 degree no protrusion door hinges.
The best space utilization I could get for this dead corner, was a massive pantry, using pie-hinged doors. I had to build, assemble, take apart and re-assemble in the house due to the size.
Tip-out tray in stainless, for the sink false drawer.
The trash cans are as big as I could fit under the island. They slide on 135lb Blum Blue motion smooth as silk.
Drawer dovetails were milled with a Leigh dovetail jig. There are no nails or screws in the drawers, everything glued up.
Cope and stick was done with a 1/2" tonge and groove, as opposed to the standard 3/8", to give a little extra glue area.
Some more notes:
All the lumber was milled from rough sawn 4/4, so my face frames and doors ended up around 7/8" rather than the standard 3/4" used in cabinet construction. I did not want to waste this pretty Cherry into more sawdust. Each part was cut from the rough sawn and then jointed, and planed perfectly flat. Compared to dimensioned lumber used by most cabinet makers, my doors turned out completely flat. When placed on a flat surface, it was almost as if air pressure held the door panels down.
There was no tint, or stain in the finish. IMHO, if one can get high quality Cherry it is gold and the natural color should be preserved.
Finally, my builder is trying to line me up for three kitchens, but I think I will be giving that a rain-check. It is not a one person job and I don't want to employ people. Also, I do not find cabinet work as rewarding as taking the time to design and build a high end piece of furniture.
Thanks for looking and reading.