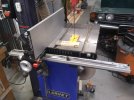
Got this as my Harvey fence and the re-saw additional fence is a not as convenient as I wanted. Not bad, but not 100%.
Observations:
VERY heavy. Sturdy.
Instructions were OK, but you have to guess a little on the hardware. OK, if you can't do that I guess you should not be near a power tool anyway. A bit of advise on how far to set the rail to the left would be a good addition.
I did not need to drill any holes in the table on my Harvey C-14.
It is very wide as it is made for all saws including ones with a decent size table unlike my 14 inch; 18's 24's etc. If I keep it, I may cut the right end off a bit so it does not stick out in my isle.
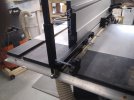
If your saw has the table slot to the front, you can shift the support bracket way to the left and clear it. That leaves the rail cantilevered but it is sturdy and I don't think I have ever used my fence to the right of the blade anyway.
Smart it has an adjustable right side stop to keep you from hitting the blade. I set mine at 1/16 clearance as that is as thin of a strip I think I will ever cut. Some creativity could be added with right and left stop blocks in the track for repeatable fence positions.
Issues:
Design/manufacturing flaw. The little nut that locks the fence position has square corners and catches in the track preventing smooth operation. I fixed this by slight tapering of the edges and polishing them.
The weight of the fence, substantial, is kept level by a nylon screw under the main block. It rides on the table top. As my saw has two miter slots, this gives a bump-bump crossing the left slot. That will shave the nylon in no time. Now, I could just polish a small ramp right where the screw tracks, but I think a better design is to add a far rail and a roller bearing. It has to be below the miter slots, but looks pretty easy to do.
Fence vertical adjustment is a terrible design. Just a pair of setscrews above and below the clamping centerline of the fence. So, they drag when moving the fence position and put an uneven strain on the extrusion. My first thought was to just tap-tap the rail but that does not work with the nylon button as above. It will when I make a rear fence and the rails will then need not be level with the table, but only perpendicular to the blade. Another possibility is to take it apart and shim between the lower and upper block. This is a one time setting so it being a pain would not be a big negative.
Paint on the main block underside was touched up with a sharpie or something. No big deal as not visible, but suggests poor factory handling.
Fence skew is very sensitive and can skew a LOT. Way more than ever should be needed. They should reduce it by 2/3s to make it easier to make a small adjustment.
Use:
I had my OEM fence set dead in line with the T-slots. Table set 90 to band, and fence shimmed with foil tape for vertical. My tracking, gullets in center, micro adjusted so I could re-saw at least two feet of 8 inch MDF stock without a side bearing spinning. Dead on. Real wood would sometimes wander as it is inconstant. I am almost there setting this one up. As much as a slight bias on the adjustment knob has a pretty large effect, so dialing it in will take a few more cuts. I was ripping 1/2 MDF strips closer than .001 on the flat over 18 inches. MDF as it is more consistent than wood so I know it is the setup I am changing, not running grain.
What I got it for, taller fence easier to reposition, sturdy, micro adjust, it does very well. I am nit-picking as thing was NOT cheap. So far I think the flaws I can resolve and it will be a super addition. The ability to skew the fence may be handy when changing to narrower steel bands where their set may be less than perfect, but return without too much fiddling when I put my carbide back on. Of course, I'll win the raffle and get the Rikon to set up with a thin band and never have to adjust the Harvey.")
I'll update as I continue to fiddle and do real projects, not just reduce my cutoffs to sawdust. I was watching the dust pattern on the throat plate. I use the ZCI tape on it to keep slivers from dropping through. I think I will add some holes behind and to either side of the blade. Dust collection was better with the larger opening of the plate, but I use my BS for a lot of quick cutoffs and small bits were dropping in. This will be in combination with my forced cross-flow vacuum based dust collection idea I am working on.
Observations:
VERY heavy. Sturdy.
Instructions were OK, but you have to guess a little on the hardware. OK, if you can't do that I guess you should not be near a power tool anyway. A bit of advise on how far to set the rail to the left would be a good addition.
I did not need to drill any holes in the table on my Harvey C-14.
It is very wide as it is made for all saws including ones with a decent size table unlike my 14 inch; 18's 24's etc. If I keep it, I may cut the right end off a bit so it does not stick out in my isle.
If your saw has the table slot to the front, you can shift the support bracket way to the left and clear it. That leaves the rail cantilevered but it is sturdy and I don't think I have ever used my fence to the right of the blade anyway.
Smart it has an adjustable right side stop to keep you from hitting the blade. I set mine at 1/16 clearance as that is as thin of a strip I think I will ever cut. Some creativity could be added with right and left stop blocks in the track for repeatable fence positions.
Issues:
Design/manufacturing flaw. The little nut that locks the fence position has square corners and catches in the track preventing smooth operation. I fixed this by slight tapering of the edges and polishing them.
The weight of the fence, substantial, is kept level by a nylon screw under the main block. It rides on the table top. As my saw has two miter slots, this gives a bump-bump crossing the left slot. That will shave the nylon in no time. Now, I could just polish a small ramp right where the screw tracks, but I think a better design is to add a far rail and a roller bearing. It has to be below the miter slots, but looks pretty easy to do.
Fence vertical adjustment is a terrible design. Just a pair of setscrews above and below the clamping centerline of the fence. So, they drag when moving the fence position and put an uneven strain on the extrusion. My first thought was to just tap-tap the rail but that does not work with the nylon button as above. It will when I make a rear fence and the rails will then need not be level with the table, but only perpendicular to the blade. Another possibility is to take it apart and shim between the lower and upper block. This is a one time setting so it being a pain would not be a big negative.
Paint on the main block underside was touched up with a sharpie or something. No big deal as not visible, but suggests poor factory handling.
Fence skew is very sensitive and can skew a LOT. Way more than ever should be needed. They should reduce it by 2/3s to make it easier to make a small adjustment.
Use:
I had my OEM fence set dead in line with the T-slots. Table set 90 to band, and fence shimmed with foil tape for vertical. My tracking, gullets in center, micro adjusted so I could re-saw at least two feet of 8 inch MDF stock without a side bearing spinning. Dead on. Real wood would sometimes wander as it is inconstant. I am almost there setting this one up. As much as a slight bias on the adjustment knob has a pretty large effect, so dialing it in will take a few more cuts. I was ripping 1/2 MDF strips closer than .001 on the flat over 18 inches. MDF as it is more consistent than wood so I know it is the setup I am changing, not running grain.
What I got it for, taller fence easier to reposition, sturdy, micro adjust, it does very well. I am nit-picking as thing was NOT cheap. So far I think the flaws I can resolve and it will be a super addition. The ability to skew the fence may be handy when changing to narrower steel bands where their set may be less than perfect, but return without too much fiddling when I put my carbide back on. Of course, I'll win the raffle and get the Rikon to set up with a thin band and never have to adjust the Harvey.
I'll update as I continue to fiddle and do real projects, not just reduce my cutoffs to sawdust. I was watching the dust pattern on the throat plate. I use the ZCI tape on it to keep slivers from dropping through. I think I will add some holes behind and to either side of the blade. Dust collection was better with the larger opening of the plate, but I use my BS for a lot of quick cutoffs and small bits were dropping in. This will be in combination with my forced cross-flow vacuum based dust collection idea I am working on.